Experiments
Run a Bayesian checkout experiment and use a coding agent with FeatBit MCP to interpret results, record a decision, and capture learning.
Overview
This walkthrough answers a concrete question: Does a shorter checkout improve completion without increasing checkout errors? You will save a hypothesis, bind a feature flag and metrics, configure a Bayesian Run, collect events, and inspect the evidence. Then you will connect a coding agent through FeatBit MCP to interpret the results, record a recommendation, and capture learning.
The screenshots use demonstration data from the same First Project / Dev environment throughout. They illustrate the workflow and do not establish that a real checkout change improves customer outcomes.
Before you begin
Prepare the following resources in the same project environment:
| Resource | Name or setting |
|---|---|
| Primary metric | Checkout completed / checkout-completed: Binary conversion, Once per user |
| Guardrail | Checkout errors / checkout-errors: Numeric value, Count all |
| Layer | Checkout experience / checkout-experience: user.keyId |
| Application instrumentation | An official SDK connected to the matching environment and Evaluation Server |
Follow Metrics and Layers to create these resources. You will create the flag below. The application needs to evaluate that flag when a user encounters checkout and send outcome events afterward, using the same stable user ID.
Create the experiment and write the hypothesis
- Confirm the project and environment in the header, then open Experiments under Release Decision.
- Click New experiment. Enter Name:
Simplify checkout. - Enter Description:
Learn whether fewer checkout steps improve completion without increasing checkout errors. - Click Create experiment. The experiment opens in Intent & Hypothesis.
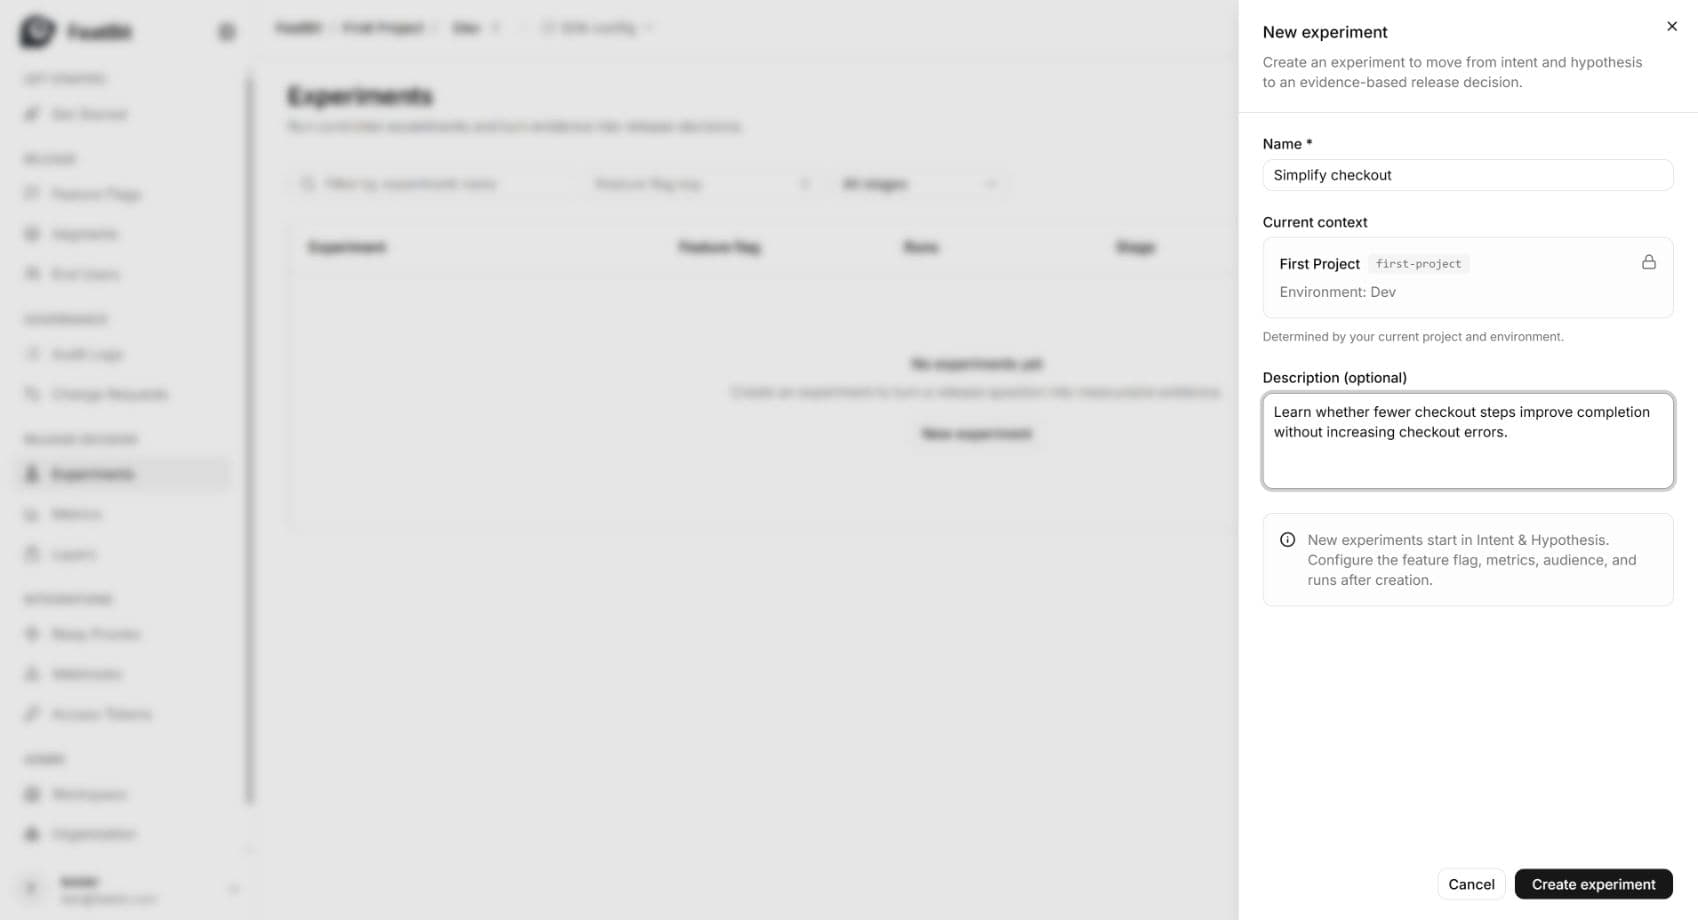
- Click Edit details and fill in the following fields, then click Save:
| Field | Example |
|---|---|
| Goal | Increase checkout completion without increasing checkout errors. |
| Intent | Reduce abandonment caused by unnecessary checkout steps. |
| Hypothesis | For users who start checkout, fewer form steps will increase the share who complete checkout because there is less effort before payment. |
| Change | Use simplified-checkout: Control (false) keeps the current flow; Treatment (true) uses fewer steps. |
| Constraints | Local demonstration data only. Keep a 50/50 flag split; use checkout-errors as a guardrail. Turning the flag off returns Control. |
- Refresh the page and confirm the saved details.
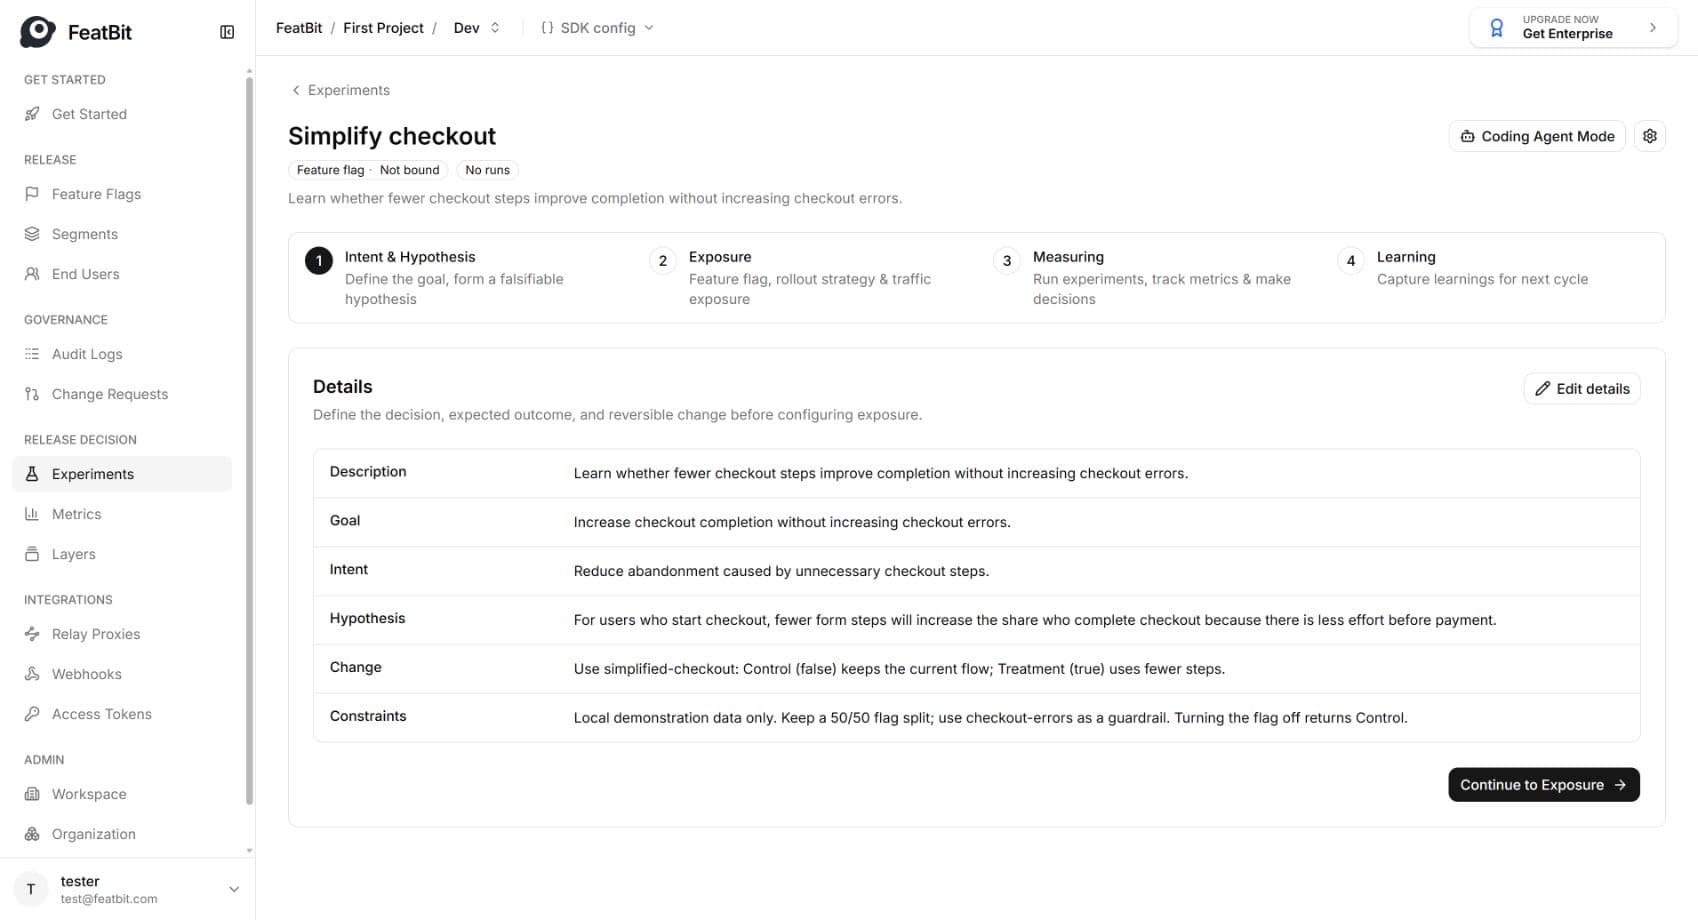
For a real experiment, also agree on a useful improvement, a representative observation period, and acceptable guardrail behavior before collecting data. A testable hypothesis connects the proposed change to a user behavior and explains why that behavior might change.
Prepare the feature flag
- Open Feature Flags in the same environment and click New flag.
- Enter Name:
Simplified checkoutand Key:simplified-checkout. - Enter Description:
Compare a shorter checkout with the current experience. - Keep Variation type as BOOLEAN. Rename the
truevariation to Treatment and thefalsevariation to Control. - Keep Serve when off as Control. Leave Turn on after creation off while preparing the rollout, then click Create flag.
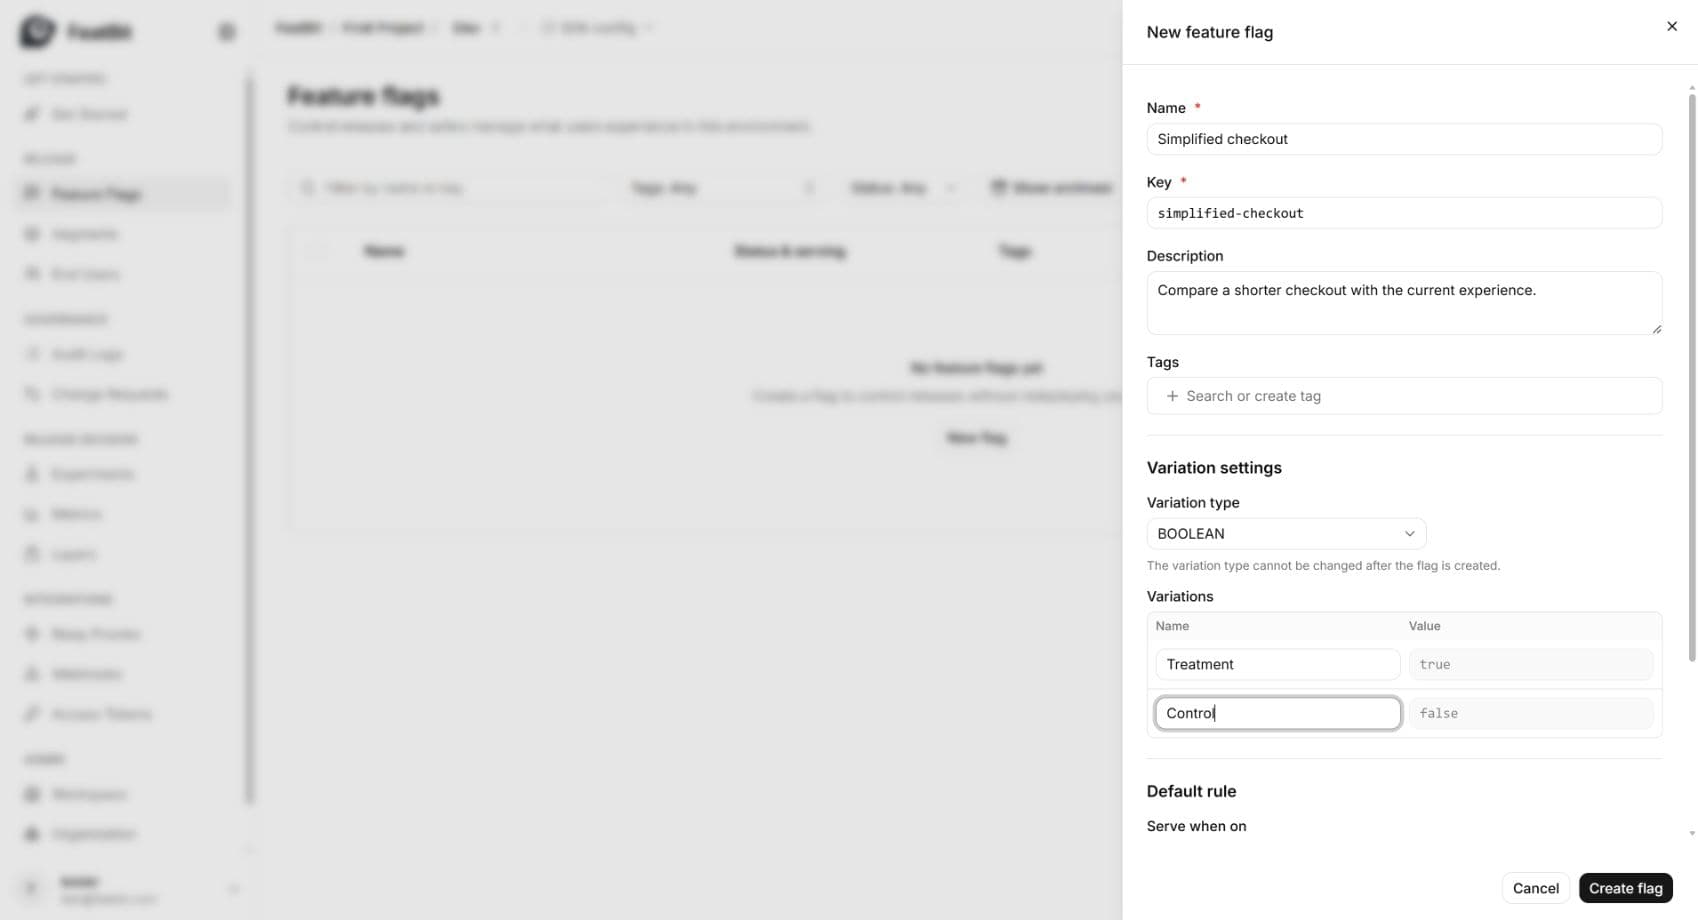
- On the new flag's Targeting tab, under Default rule → When flag is ON, select Rollout percentage.
- Set Treatment to
50%and Control to50%, with Dispatch by set tokeyId. Click Apply. - Click Review & save, review the change, and click Save changes.
- Turn Flag status on and confirm. Refresh to verify ON, the saved 50/50 rollout, No users added under individual targeting, and No rules yet under targeting rules.
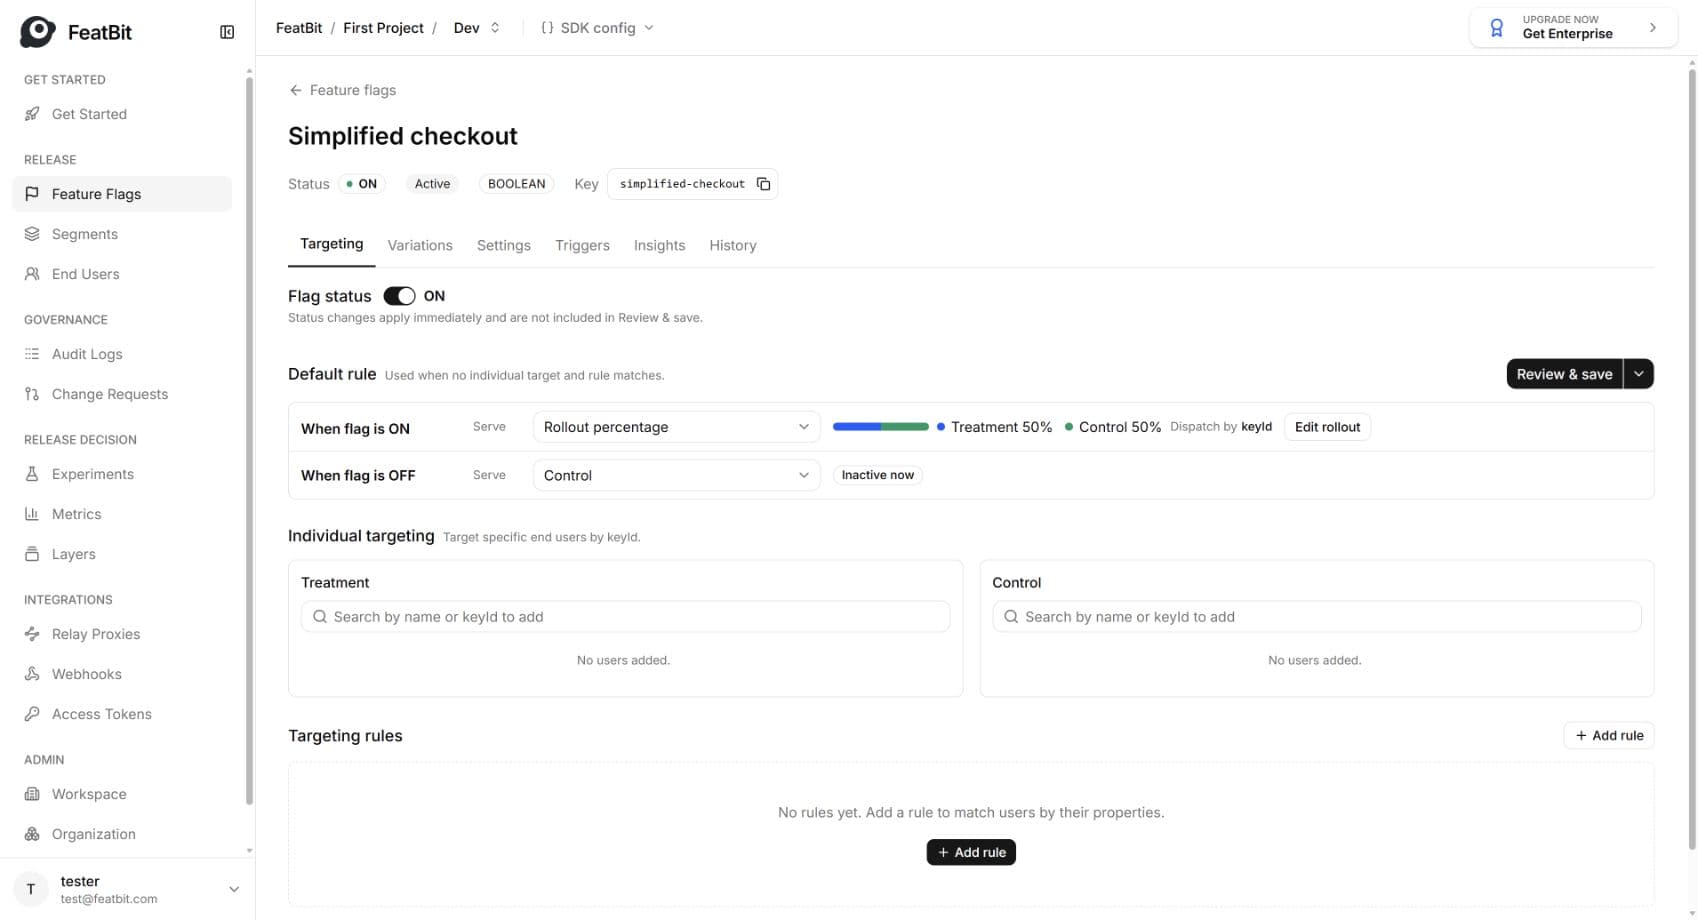
The new flag uses default experiment-exposure collection. Keep SDK event collection enabled and verify that exposure samples appear when you analyze the Run. The current Targeting UI does not expose a separate experiment-collection switch.
The flag controls application behavior. Selecting Control and Treatment in a Run later only chooses how to compare those variants; it does not configure flag rollout.
Bind the flag and metrics
- Return to Simplify checkout and click Continue to Exposure.
- Click Select flag, choose Simplified checkout, and click Select flag to save.
- Inspect the saved variation table. Confirm Control = false and Treatment = true, and use the displayed variation IDs to distinguish the actual variants.
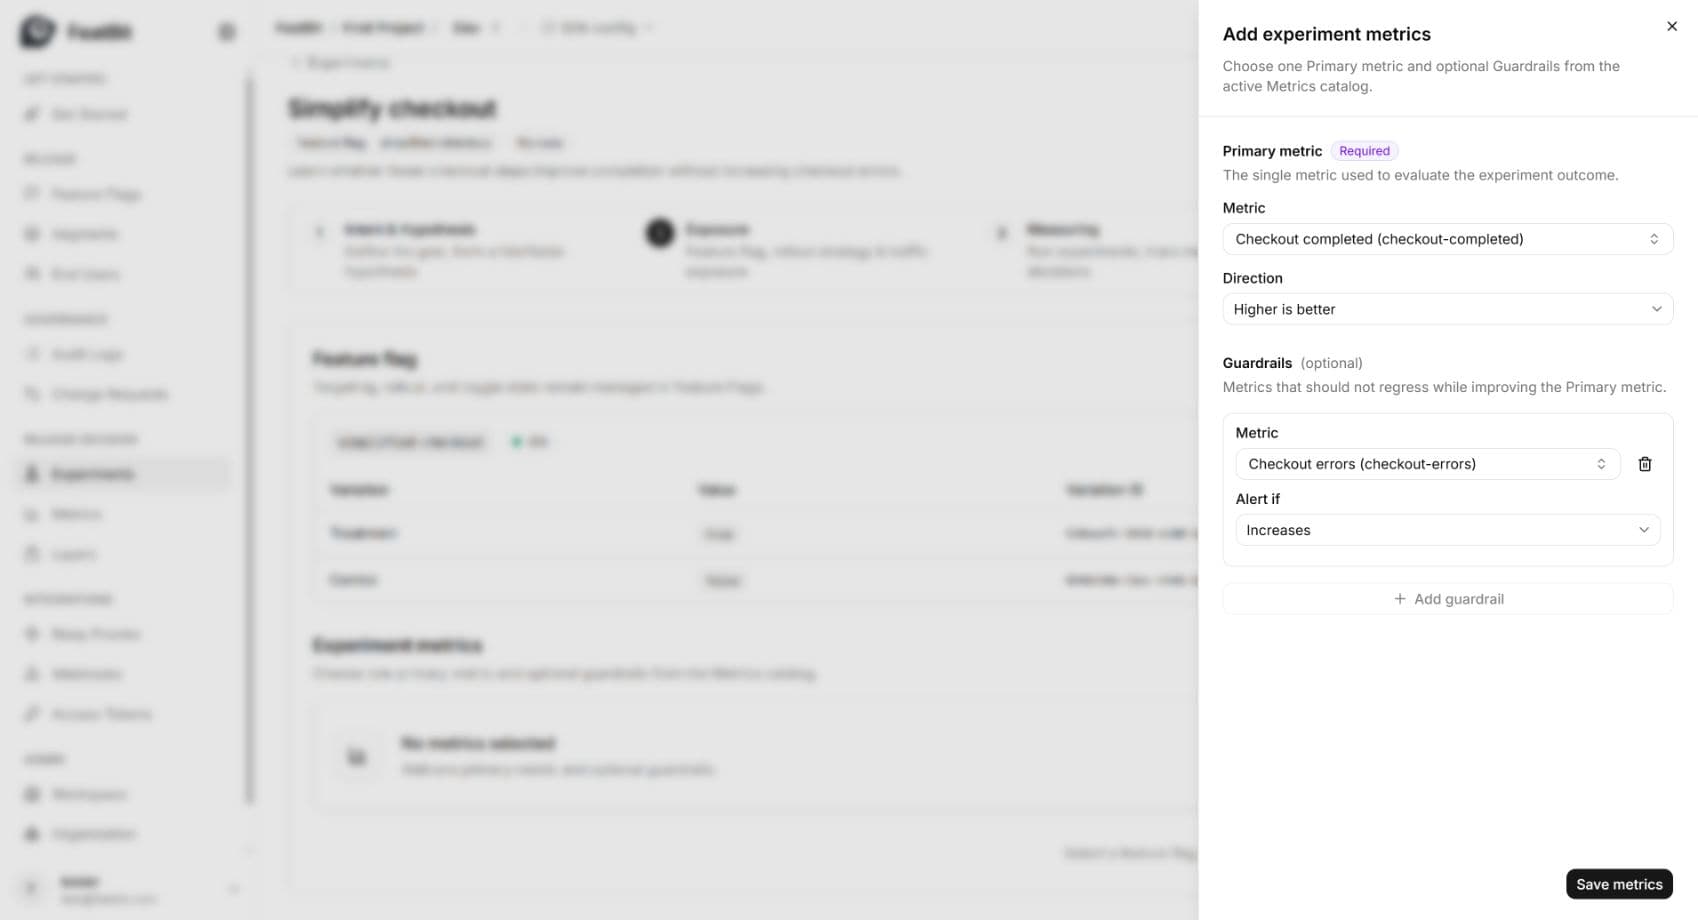
- Click Add metrics.
- Choose Checkout completed (checkout-completed) as the Primary metric and keep Direction → Higher is better.
- Click Add guardrail and choose Checkout errors (checkout-errors). Set Alert if → Increases.
- Click Save metrics, refresh, and confirm the saved configuration.
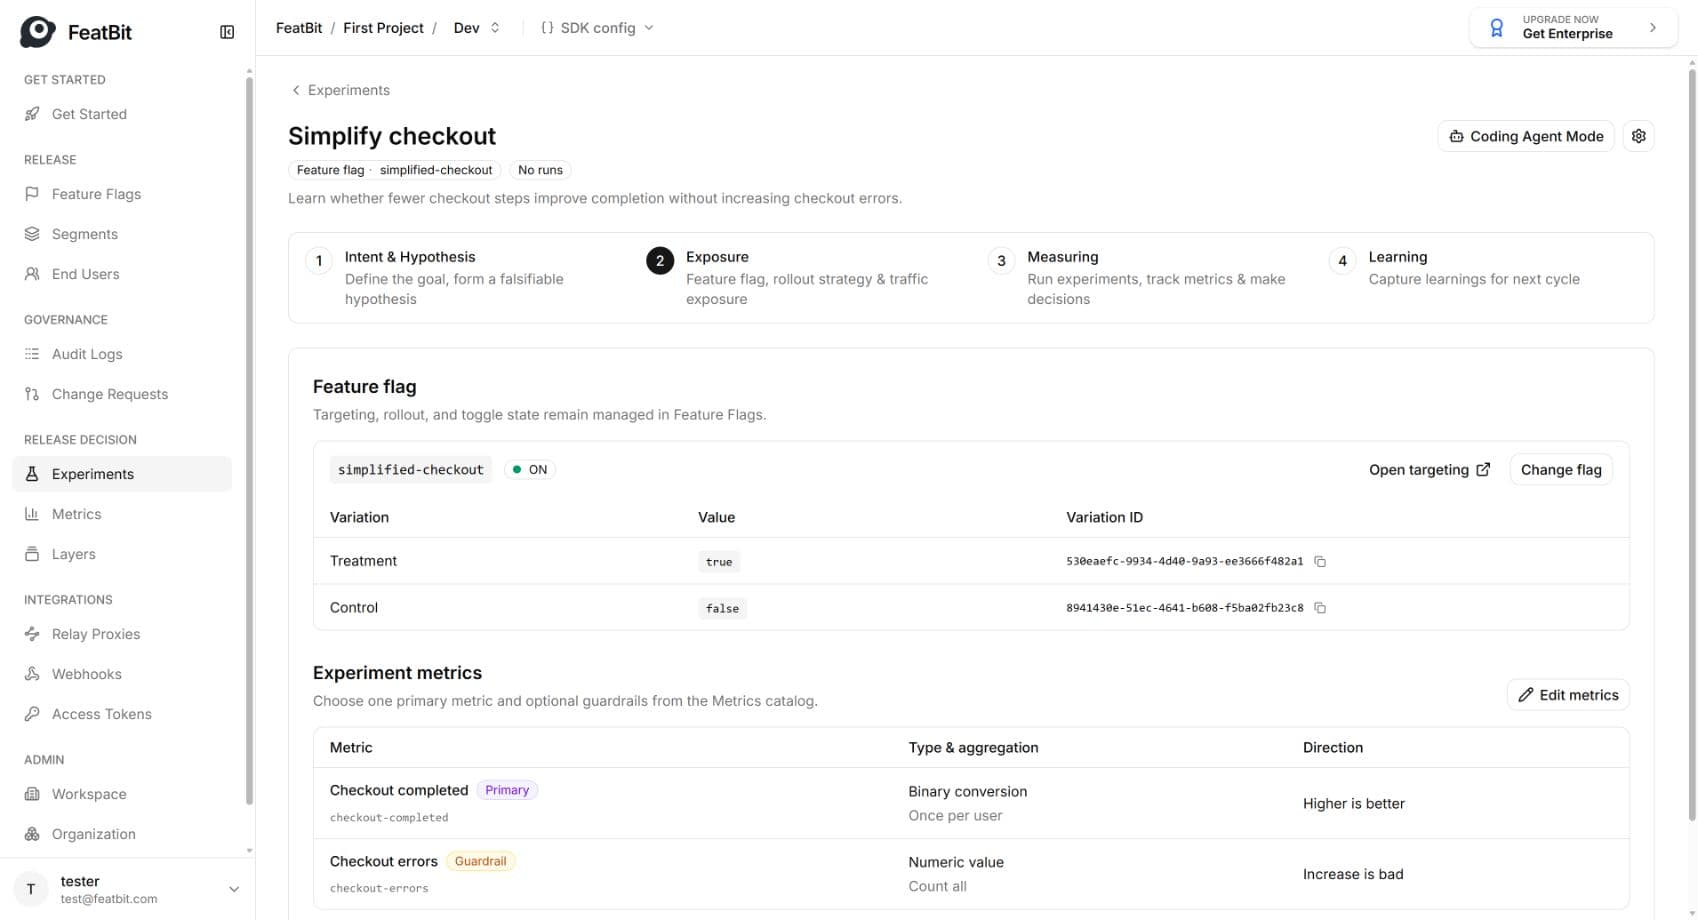
The saved guardrail label is Increase is bad; analysis displays the equivalent preferred direction as Lower is better. Directions belong to this experiment's metric bindings, while the underlying metric definitions remain reusable.
Your variation IDs will differ from the screenshot. Select by the confirmed name and value, not by list position.
Create a Bayesian Run
- Click Continue to Measuring, then New run.
- Keep Analysis method → Bayesian A/B/n.
- Under Control, explicitly select the variation named Control (
false). Do not accept the initially selected first variation without checking it. - Under Treatments, check the variation named Treatment (
true). - Set Start date and time to the beginning of your collection period.
- Keep End → No fixed end while collecting the demonstration batch.
- Set Minimum sample per variant to
500for this example, then click Create run.
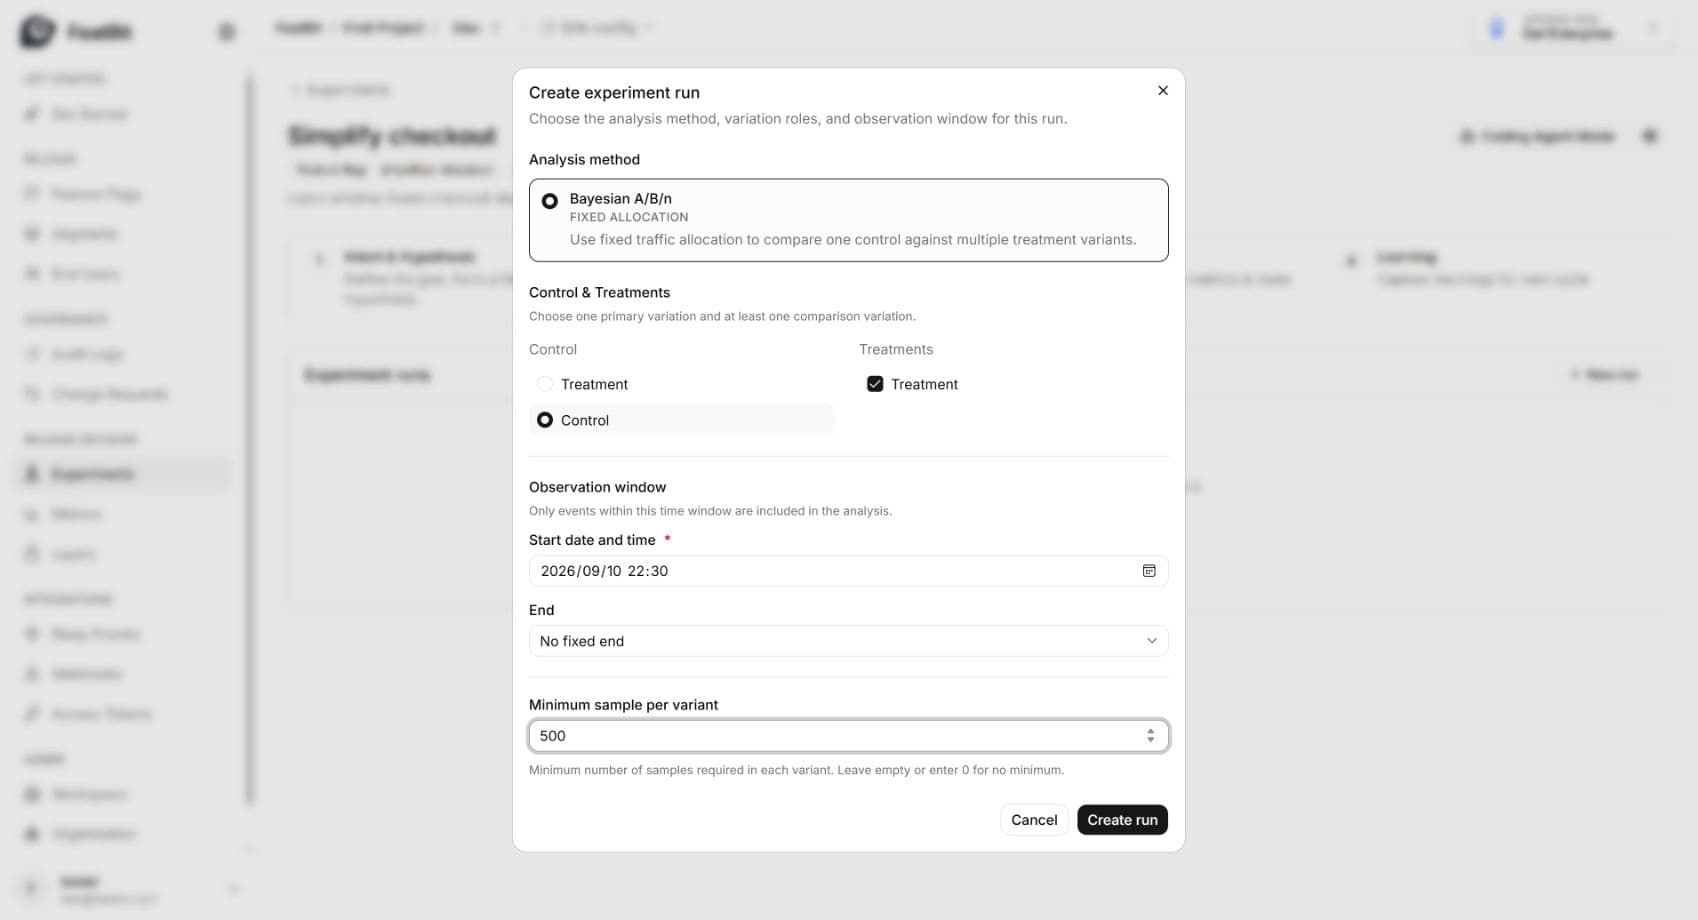
The new run-1 appears under Measuring. The minimum is checked for each variant, not against the combined total. It is a demonstration threshold, not a universal sample-size recommendation. Passing it does not guarantee a useful or conclusive effect.
Before analysis, Full analysis may show No evaluable data and Window: Not recorded. Inspect Observation window to verify the saved Run configuration; the analysis metadata is populated when analysis runs.
Configure Layer eligibility and sampling
- In
run-1, click Edit assignment under Experiment traffic assignment. - Verify the Control and Treatment selections again.
- Select Layer → Checkout experience (checkout-experience).
- Keep Assignment unit as
user.keyId. Set Bucket start to0and Bucket end to50. - Keep both variants' Analysis sampling at
100%, and leave Audience filters empty. - Click Save changes. Refresh and reopen the editor to check that all settings persisted.
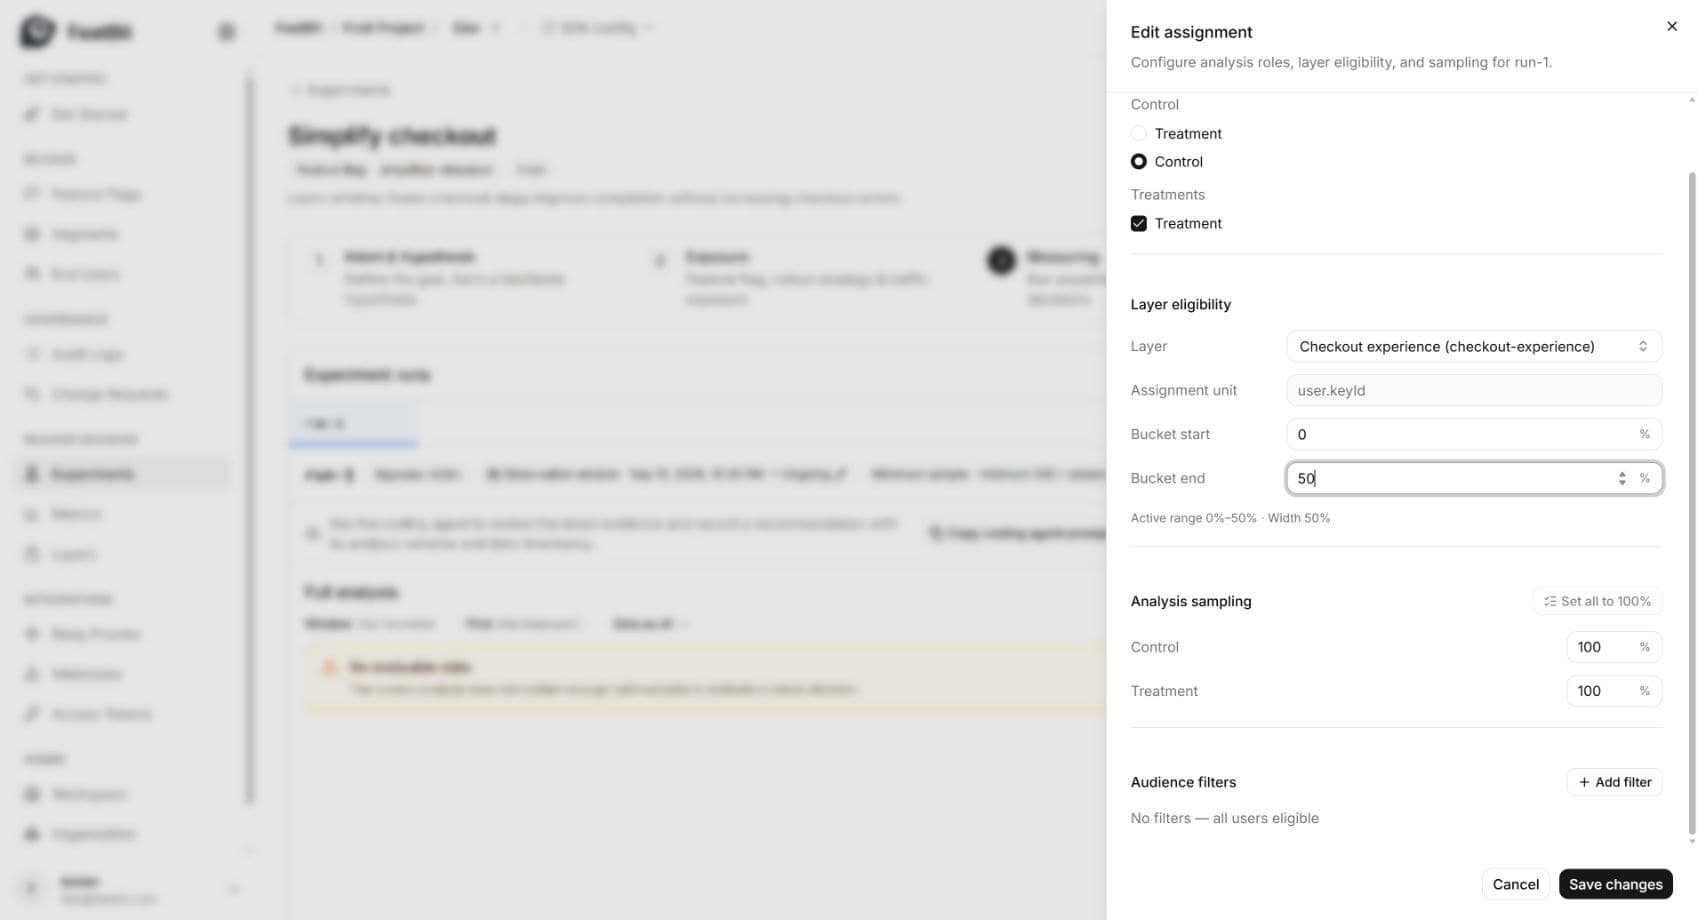
This selects the first half of the Layer for analysis. The flag still serves its own 50/50 split across users. Analysis sampling retains all eligible users in each variant. See Layers for the distinction and the saved reservation display.
Collect events and analyze
- Use the .NET Server SDK example, or another official SDK, in the same environment.
- For each user who encounters checkout, evaluate
simplified-checkoutwith a stable user ID and serve the corresponding flow. - After an actual completion, send
checkout-completedfor that user. For each actual checkout error, sendcheckout-errorswith value1. Users with no outcome event still contribute to the exposed-user denominator. - Allow queued SDK events to flush and the server to process them.
- In Measuring → run-1, click Analyze latest data. Wait for analysis to finish and inspect Data as of, the analysis Window, sample counts, and metrics.
The screenshots below came from 4,000 demonstration users evaluated by the official .NET SDK, without prefiltering by Layer. Simulated outcomes were generated after each actual flag evaluation. The Layer retained 1,982 users: 994 Control and 988 Treatment. Your counts and results will depend on your users, instrumentation, and observation window.
Finish the demonstration window
For a reproducible snapshot of a finished collection period:
- Click Observation window on
run-1. - Select End → On a specific date and set an end after your last intended event.
- Click Save window, then Analyze latest data again.
- Refresh and confirm that the saved analysis Window matches the Run's configured window.
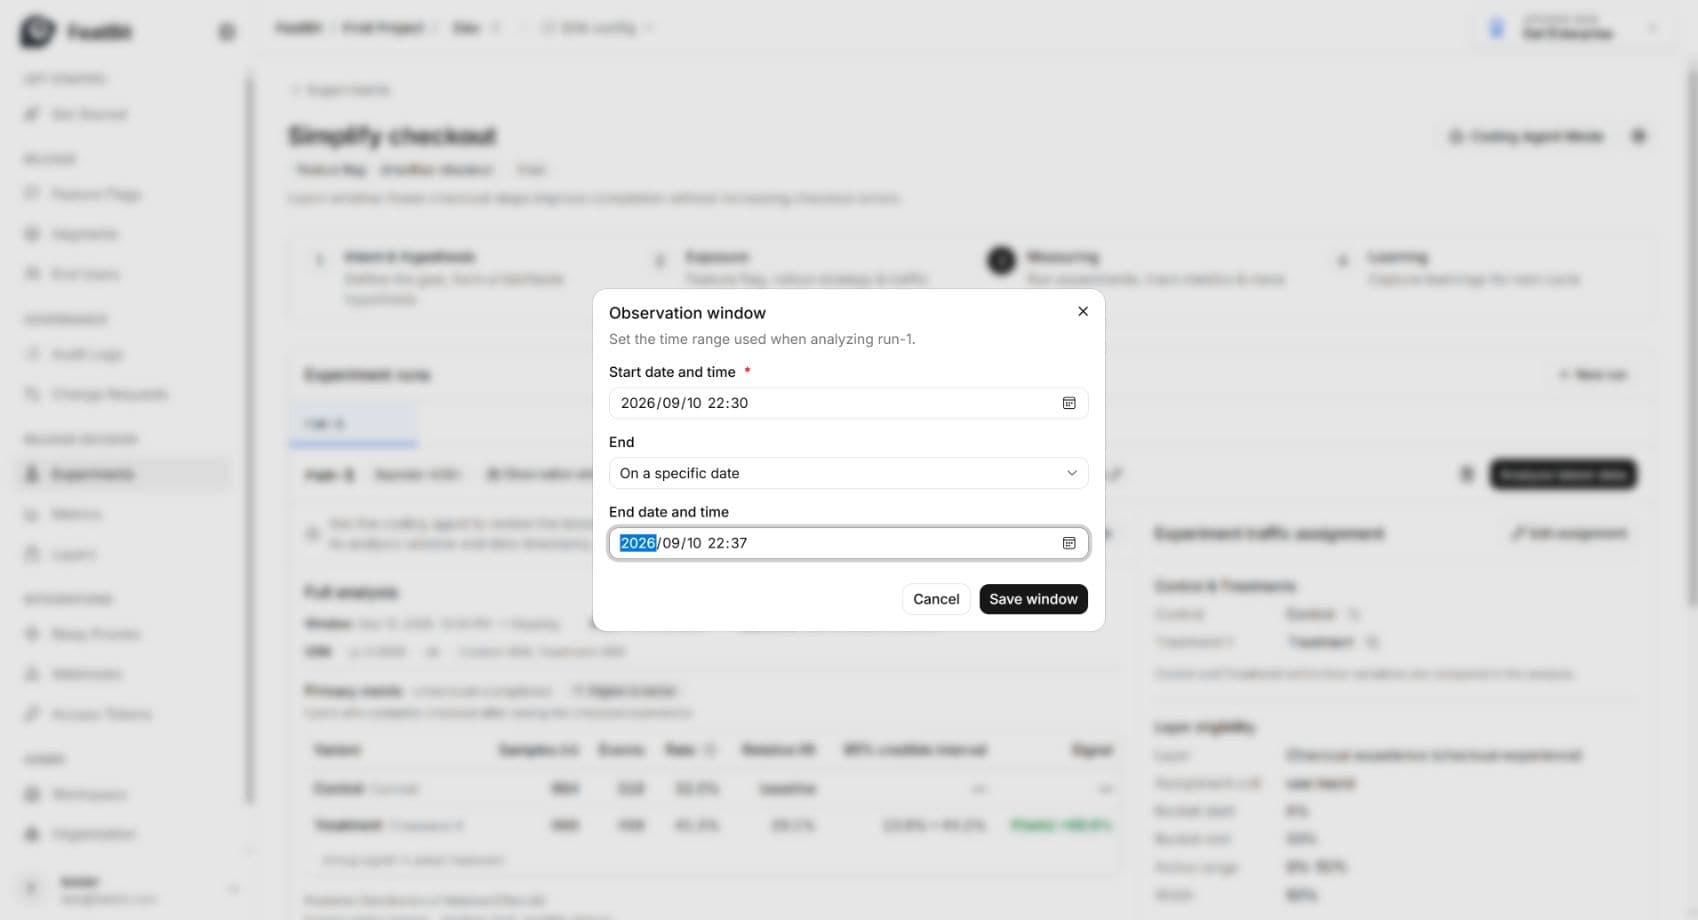
Date and time inputs use your browser's local time. Choose a window that includes your own events.
After changing a window, old results can remain visible with a notice that they use the saved analysis window. Analyze again before interpreting them. Ending a Run's observation window does not turn off its flag.
Read the evidence
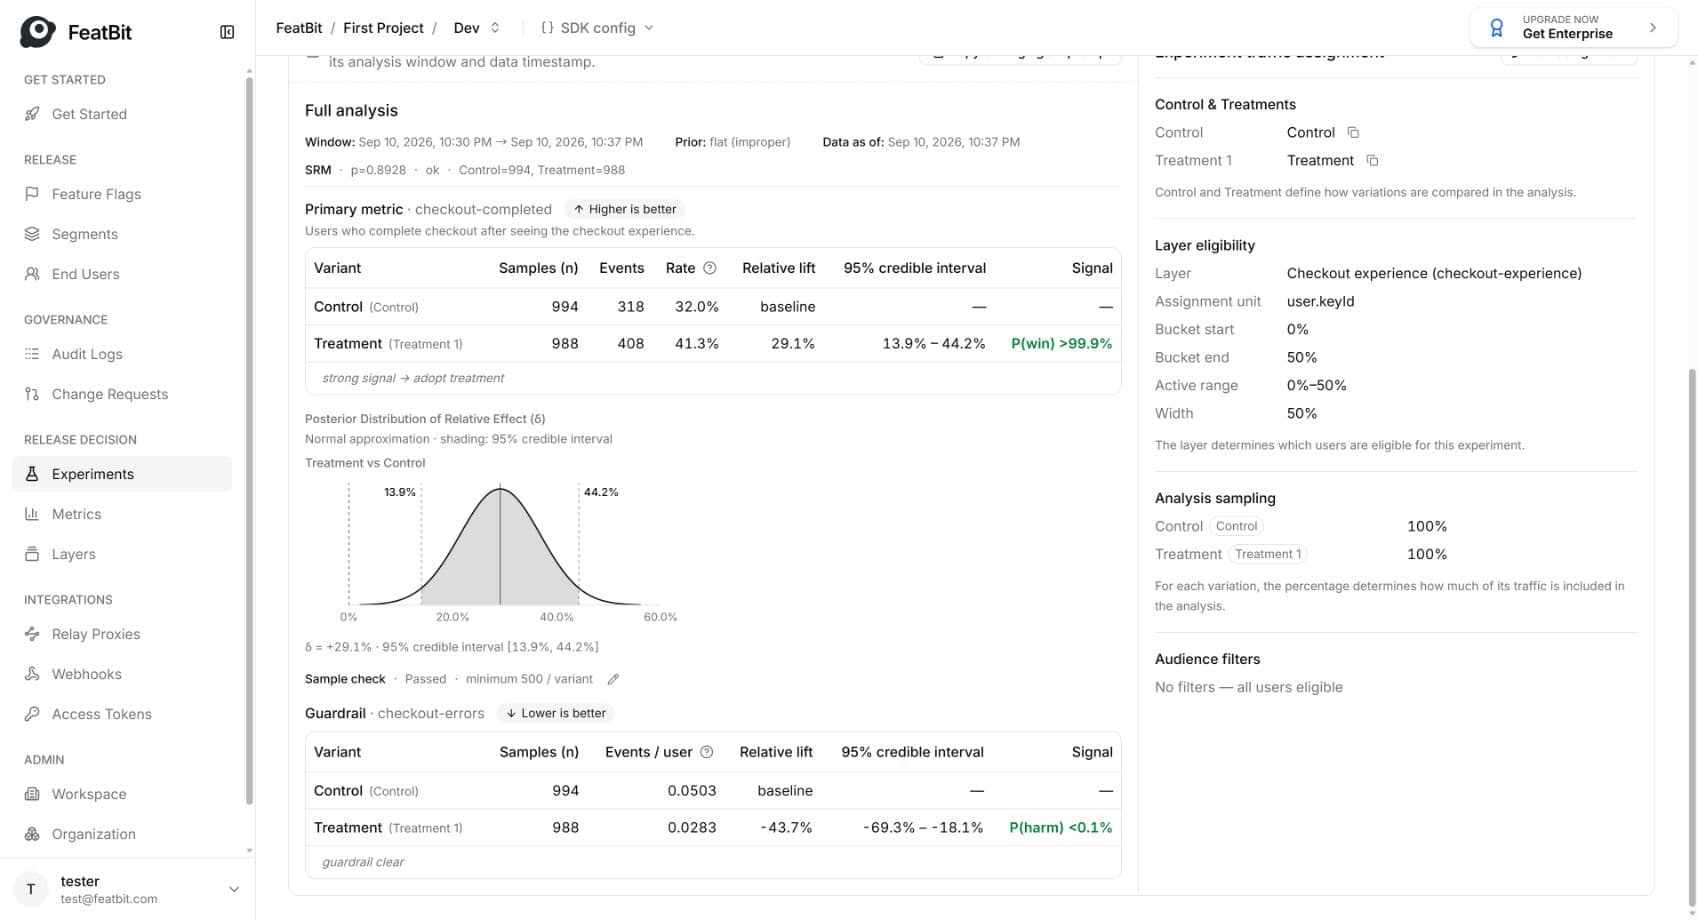
The actual results for this demonstration were:
| Result | Control | Treatment |
|---|---|---|
| Samples (n) | 994 | 988 |
| Checkout completions | 318 | 408 |
| Completion rate | 32.0% | 41.3% |
| Checkout errors per user | 0.0503 | 0.0283 |
Read the page in this order:
- Window and Data as of: Confirm that the analysis covers the intended events and was recomputed after configuration changes.
- SRM: The page reports the sample ratio mismatch check. Here it shows p=0.8928 · ok. A mismatch deserves investigation before trusting the effect; an
okresult is not proof that all instrumentation is correct. - Sample check: Both variants pass the configured minimum of
500. Read the per-variant counts rather than the combined total. - Primary metric: Treatment's observed completion rate is 41.3%, compared with 32.0% for Control. The displayed relative lift is +29.1%, with a 95% credible interval of 13.9%–44.2% and P(win) greater than 99.9%.
- Guardrail: Errors fall from 0.0503 to 0.0283 per user. The page shows −43.7% relative lift, a 95% credible interval of −69.3% to −18.1%, P(harm) below 0.1%, and guardrail clear.
Relative lift compares the change with the Control baseline. Here the absolute conversion-rate difference is about 9.3 percentage points; that is different from a 29.1% relative lift. The credible interval and probabilities summarize uncertainty under the analysis model and its displayed prior. The posterior chart is labeled as a Normal approximation.
The primary metric reports a strong signal in this dataset, and the guardrail supports an improvement in the preferred direction. Because these outcomes are simulated, the result validates the demonstration workflow, not the business hypothesis for real customers.
If you see No evaluable data, check environment, flag key, exposure collection, user IDs, metric keys, window, Layer range, and sampling before collecting more data. If samples are below the minimum or evidence remains uncertain, record that limitation instead of declaring a winner.
Set up Coding Agent Mode
FeatBit calculates the experiment statistics. A coding agent, such as Codex, uses the FeatBit experimentation skill and FeatBit MCP to review those statistics in context and save recommendations and learning back to the experiment.
- Click Coding Agent Mode in the experiment's upper-right corner.
- Under Install release-decision skill, copy and run the installation command once at the user or project level:
npx skills add featbit/featbit-skills --skill featbit-experimentation- Under Connect FeatBit MCP, click Create MCP token if no token exists or the saved token has expired. If Token ready is already shown, reuse that token.
- Click Copy setup prompt and paste it into your coding agent. Ask it to apply the connection configuration and verify access by listing the FeatBit tools and reading this experiment. Complete any restart or reload the agent requires before continuing.
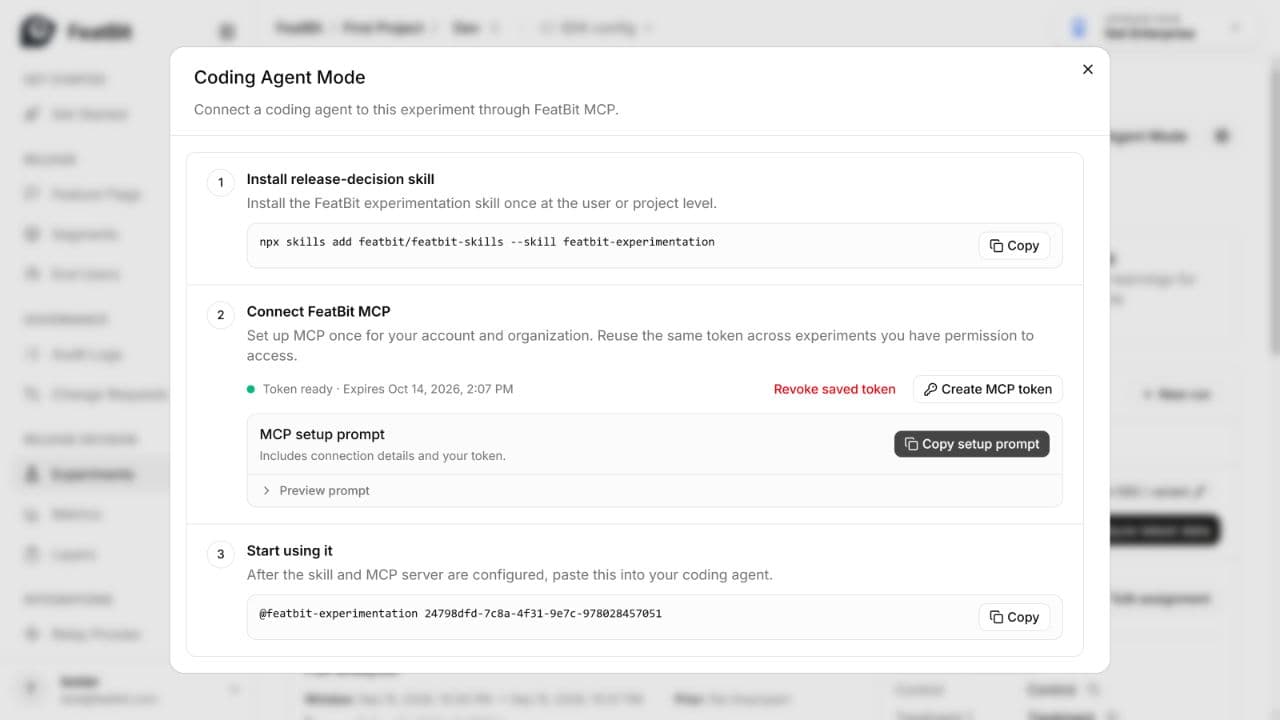
The setup prompt contains your token; keep it private and out of source control. Setup is shared across experiments your account can access in the organization. When the token expires, create a new one and repeat the connection step. Token ready confirms that a token exists; the agent's successful experiment read confirms the connection works.
Record the decision and learning
Use the connected coding agent for the following steps. Analyze latest data produces statistical results; the agent interprets the evidence and writes the Run's recommendation and learning through MCP.
Ask for a recommendation
- Return to Measuring and select
run-1. - Click Copy coding agent prompt next to the analysis.
- Paste the copied prompt unchanged into the coding agent where you configured FeatBit MCP. It identifies the experiment and selected Run, and asks the agent to record a recommendation, summary, reason, and the analysis Window and Data as of.
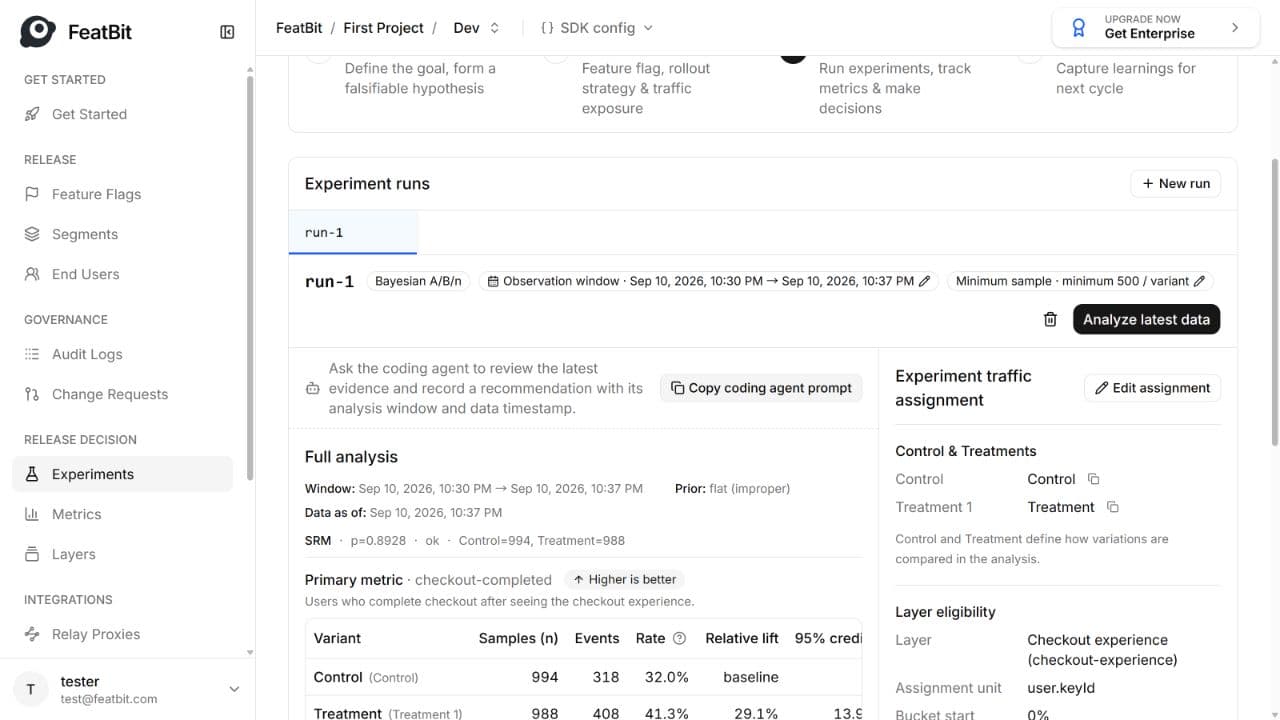
The agent should read the saved experiment, review the hypothesis, sample health, SRM, primary metric, guardrails, and observation window, then explain its recommendation. For this walkthrough, make clear that the outcomes are demonstration data. You can ask follow-up questions before accepting the reasoning.
- After the agent confirms that it saved the recommendation, refresh FeatBit and return to Measuring → run-1.
- Check Coding Agent recommendation, its decision label and Summary, then expand Reason to review the evidence and limitations.
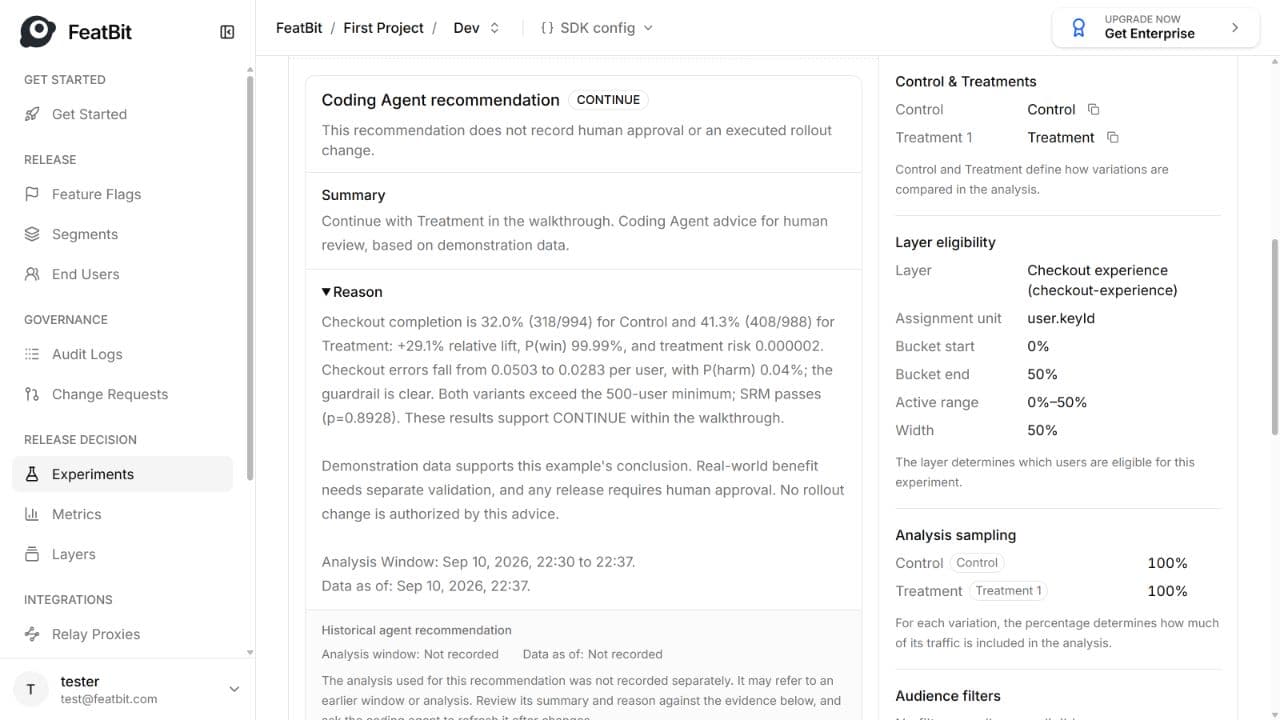
In this walkthrough, a follow-up clarified that the recommendation concerns the recorded demonstration data. Codex then saved CONTINUE: Treatment improves checkout completion, the error guardrail is clear, both samples pass the minimum, and SRM passes. This supports the example's next step; real customer benefit still needs validation with representative traffic.
| Decision | Recommended next step |
|---|---|
| CONTINUE | Move toward Treatment when the evidence and rollout conditions support it. |
| PAUSE | Hold the current rollout while investigating a concern. |
| ROLLBACK | Return to the safer experience when the evidence shows harm. |
| INCONCLUSIVE | Collect better evidence before choosing a rollout direction. |
The recommendation is advice for human review. Saving it does not execute a feature-flag change. If you decide to change rollout or targeting, explicitly request and review that separate action.
The current recommendation panel may label its separate timestamp fields Not recorded. Check the Window and Data as of included in the agent's reason against Full analysis. After changing data or configuration, refresh the analysis and ask the agent to review the Run again.
Capture learning in the same conversation
Continue in the same coding-agent conversation. For example:
Capture the learning for run-1: what changed, what happened, what was
confirmed or refuted, why, and the next hypothesis. Distinguish the
demonstration results from claims about real customers. Save the learning
to this Run through FeatBit MCP and update the experiment's Key learning
summary. Keep the original hypothesis for comparison.- Discuss the agent's interpretation and refine the next hypothesis as needed.
- Ask it to save the agreed learning through FeatBit MCP. A response in chat alone does not update FeatBit.
- Refresh FeatBit and open Learning. Check Key learning for the experiment summary and Experiment run learnings → run-1 for the Run's decision summary and learning fields.
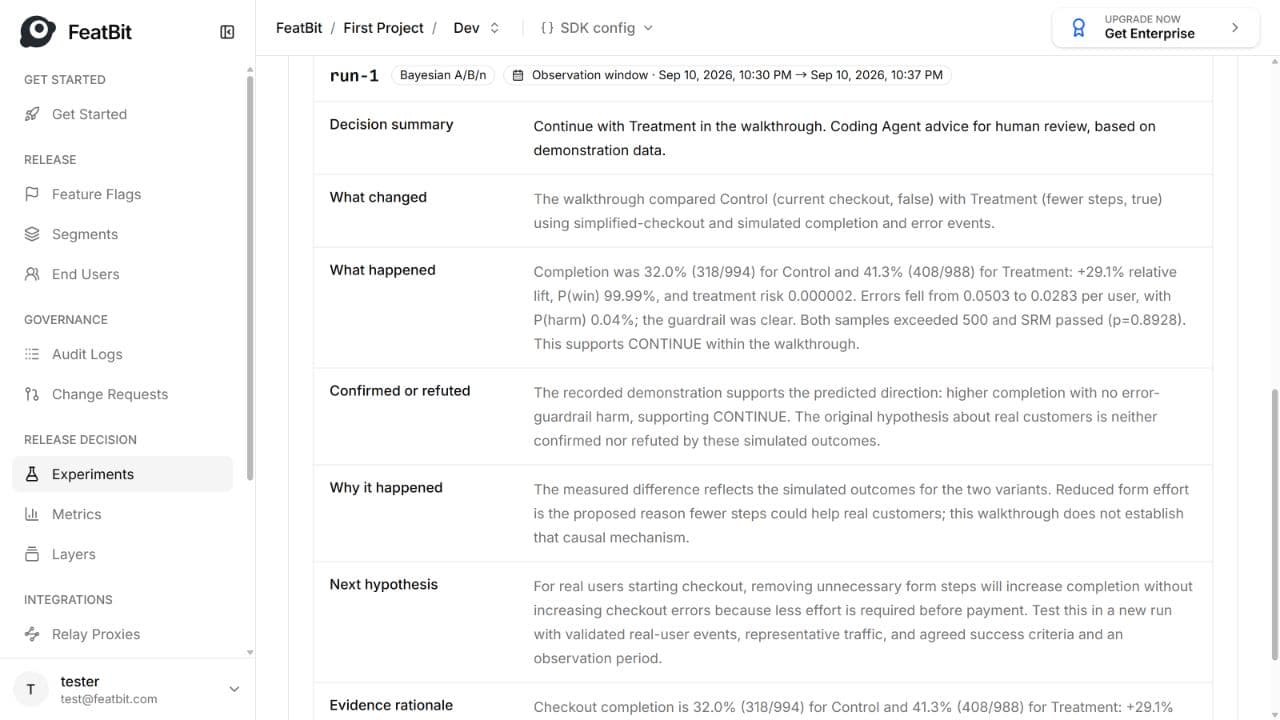
In this example, the learning records the higher completion rate and clear error guardrail that support CONTINUE within the walkthrough. It preserves the original hypothesis and proposes testing it with representative real-customer traffic in a new Run.
Edit learning can update the experiment-level note manually. The coding-agent workflow also fills the structured Run learning shown below it, keeping the interpretation attached to the evidence from that Run.
Keep discussing the experiment with your agent
You can use the same conversation throughout the experiment, from intent and hypothesis to exposure, measurement, decisions, and the next iteration. Ask it to read the current FeatBit state when answering questions such as:
- “Is our hypothesis specific enough to test, and what result would challenge it?”
- “Explain how the flag's 50/50 rollout, the Layer range, and analysis sampling affect this Run.”
- “Which results support this recommendation, and what limitations should I review?”
- “What would change the recommendation, and what should we measure next?”
- “Review the whole experiment and point out any missing steps before the next Run.”
Ask for explanations when exploring an idea, and explicitly ask the agent to save agreed changes when you want FeatBit updated. Reopen Coding Agent Mode to copy the experiment's Start using it prompt when starting a new conversation.