API access tokens
Overview
This topic explains how to use API access tokens to authenticate with the FeatBit REST API, as well as constraints and suggestions for implementing them.
API access tokens are private
Only you have access the secret values of tokens you create. Other account members cannot access them. Administrators can delete your tokens, but cannot view their values.
Scoping personal API access tokens
You can scope your API tokens to restrict the set of operations they can perform. For example, you can build an integration that only has read access to the REST API.
Understanding access token permissions
Personal API access tokens and the principle of least privilege
As a best practice, we recommend giving your tokens the smallest scope required for your integration. For example, if your integration is not designed to modify your Production environment, use specific permissions actions according to your needs to restrict access appropriately.
There are two types of tokens you can create in FeatBit. You can create a personal token, which is linked to an account member's account, or a service token, which is independent of the account that created it.
The different token types respond differently when their creators' permissions change. Because of this, you may want to use different types of tokens for different things.
Personal tokens
You can configure a personal access token to have the same permissions that you do. Your personal tokens can never do more than you can in FeatBit.
If your own permissions are ever reduced, personal tokens you have created have reduced scope as well. For example, if you have the ManageFeatureFlag permission and create a personal token, but then the permission are removed from you, your token is also downgraded. If you make a request to feature flags with that token, FeatBit would return the following result:
{
    "success": false,
    "errors": [
        "Forbidden"
    ],
    "data": null
}
If an account member with personal access tokens is removed from your FeatBit team, their personal tokens are deactivated.
Use a personal token when you want to access the FeatBit API for your temporary or personal use.
Service tokens
Unlike personal tokens, service tokens are not tied to your FeatBit profile. You can assign existing existing permissions to a service token, but you can never give a service token more permissions than you have.
A service token's permissions are permanently fixed after you create it. You cannot edit the permissions of a service token, and even if your permissions change, the service token's permissions stay the same.
Use a service token to create long-term integrations with the FeatBit API.
Creating API access tokens
You can create an API access token from the Integrations/Access tokens page.
By default, the tokens you create are personal tokens. You can choose to create a service token instead during the token creation workflow.
Save new tokens immediately
Your API access token is visible one time, immediately after you create it. If you leave or refresh the page where the token is displayed, it will be obscured and no longer visible. You must copy and store new access tokens somewhere secure before you leave the creation page, or you will lose access to the token.
Here is a screenshot of the Access tokens page:

To create an access token:
- Navigate to Integrations/Access tokens page.
- Click on the Add button on the top right of the page, the Add Access Token panel appears\
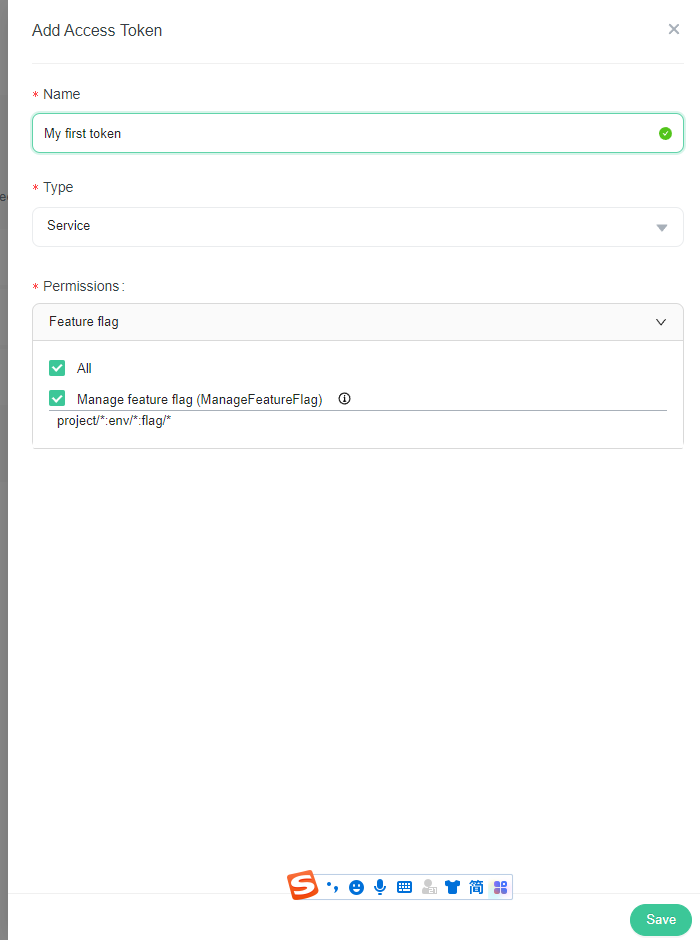
- Give your token a human-readable Name.
- Select the type of the token from the dropdown list.
- Assign the permissions you want to grant to the token if it's a service token.
- Click Save button.
- Copy and save the token somewhere secure. After you leave this page, the token is obscured.
After you create a token, you can edit it's name, activate, deactivate or delete it. You can also manage existing tokens from this page.
Manage access tokens
To manage an access token:
-
Navigate to the Integrations/Access tokens page.
-
Find your token in the list.
-
Click the overflow menu for the token and select from the menu:\
- Edit: modify the name of the access token.
- Activate/Deactivate: toggle the status of the token. A token can be used only when its status is active. Otherwise, API calls made with that token return Forbidden response.
- Remove: this allows to delete the token. If you take this action, the token can never be restored and it can never be used any more.
Here is a screenshot of the edit and delete options:

Restricting who can create and manage API access tokens
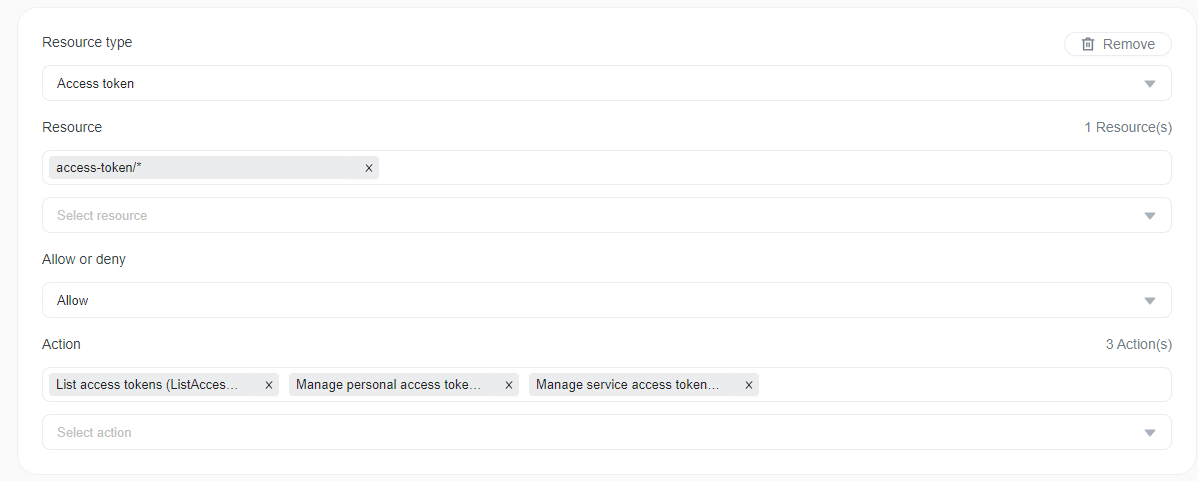
By default, all account members with Owner, administrator or Developer policies can create access tokens limited to their existing permissions. There are three permissions related to the access token resource:
- ListAccessTokens
- ManagePersonalAccessTokens
- ManageServiceAccessTokens
You can restrict account members from creating or managing access tokens with IAM policy by adding/removing those actions. Here is a screenshot of the IAM policy statement related to access tokens.